Home › Field notes › Modular Photography Backpacks: Camera Module Protection Engineering
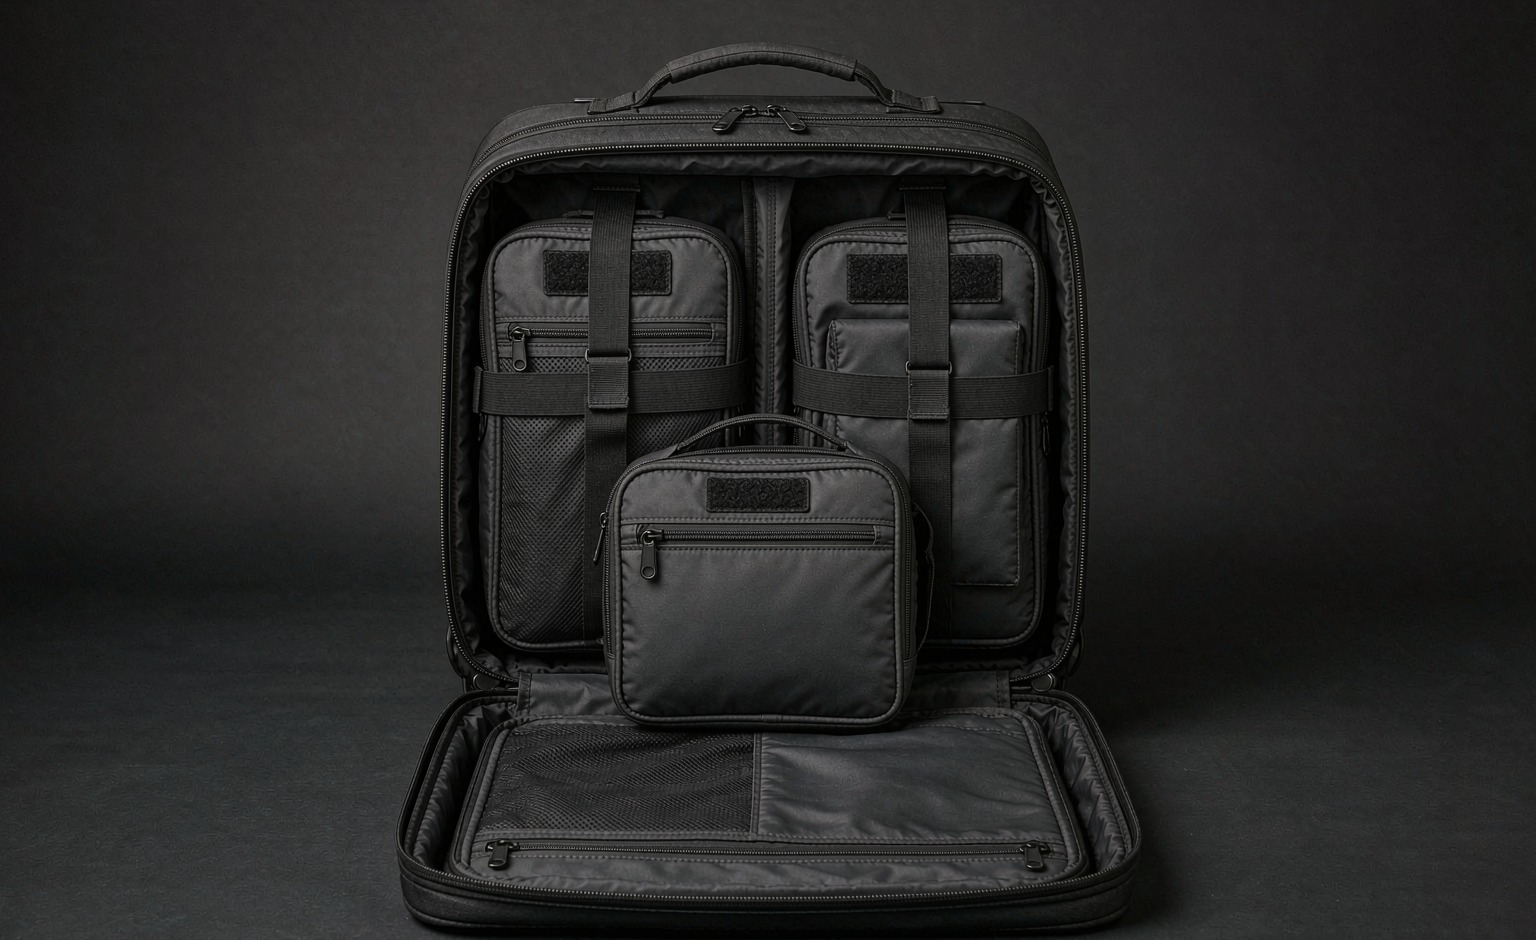
A modular photography backpack protects equipment through load management rather than padding alone: the camera insert must transfer mass into the chassis so the body never rests on a lens, and access must let the user retrieve a camera one-handed while standing. Both requirements are measurable rather than subjective, which is fortunate because this is the segment where opinion is loudest and evidence is scarcest. Divider compression behaviour determines whether gear migrates over hundreds of uses, contact surface dictates whether chrome rings and rear screens get scratched, and zip construction decides how much dust arrives during a shoot. Interface choice then governs everything else, with 25 mm tape rows at 38 mm pitch carrying external units. Development for this reference normally runs 6-10 working days, extending to 12-15 where moulded shells are involved, before a bulk run occupying 35-50 days and release against a 2.5 acceptance number with defect classes agreed in advance.
What a camera insert is actually doing structurally
The instinct when specifying protection is to reach for more foam, which is understandable and usually wrong. Padding distributes nothing on its own; geometry does that, and only after the geometry is right does additional material help. The correct analysis is distribution: the contents weigh several kilograms and sit as discrete rigid objects, so what matters is how each object's mass reaches the harness and eventually the ground.
An insert that rests its base directly on the bag floor puts the heaviest item, usually a body with a lens attached, onto whatever surface happens to be underneath. Because lenses protrude forward, the natural resting attitude puts the front element or the hood in contact rather than the baseplate. Every sensible decision follows from refusing that geometry, beginning with the recognition that protection and cushioning are not the same thing.
Suspension is the answer. A structured insert with a rigid perimeter and a suspended base panel holds each item above the bag floor, so the camera never becomes the lowest point. This is why competent designs specify a moulded or semi-rigid insert rather than a fabric cube with loose padding, despite the latter being cheaper and easier to photograph attractively.
Second, the insert must tie into the chassis rather than float inside it, which is why the same anchoring logic used for any heavy module applies without modification here. If it merely drops into the main compartment, every impact translates through the shell and into the contents. Anchoring it at several points around its perimeter converts impacts into chassis movement instead, which is exactly the transfer a platform is supposed to enable. Put bluntly, if the insert can slide freely inside the outer compartment then the buyer has purchased padding rather than protection, and no amount of additional foam will close that gap.
Verdict: Specify a semi-rigid suspended insert tied into the chassis at several points rather than thicker foam, because geometry distributes load and padding on its own distributes nothing.
Divider specification: compression set beats thickness
Divider thickness looks like the specification that matters and is not. A thick divider that loses thickness under sustained pressure stops retaining anything, and it loses that property gradually enough that nobody notices until gear has already moved.
| Construction | Initial feel | Behaviour over extended use | Decisive measurement |
|---|---|---|---|
| Low-density foam slab | Soft and compliant | Takes a permanent set and loosens | Thickness retained after sustained compression |
| Laminated foam core | Firm yet forgiving | Holds recovery well | Recovery rate after a stated dwell period |
| Moulded shell with fabric cover | Rigid | Stable, transfers less into contents | Compression load deflection across the face |
| Folded fabric with stiffener | Crisp initially | Stiffener creases and loses line | Crease recovery after repeated folding |
| Air-filled or inflatable element | Adjustable | Loses pressure slowly with temperature | Pressure retention across a temperature range |
Request the fourth column as data rather than as description, then write a retention threshold into the tech pack with a stated dwell period and a stated load. Vendors answering this question confidently are usually measuring it; those answering with adjectives generally are not. Anything retaining less than the agreed proportion of its original thickness after a stated dwell fails, regardless of how good it felt in the hand at the reference review.
Contact surfaces deserve equal attention, and receive far less than they warrant given how often they cause the complaint that eventually reaches customer service. Rough or coarse materials abrade chrome rings, matte black paint and rear screens over the course of hundreds of insertions. Specify a smooth low-abrasion facing, then verify by rubbing the actual material against a representative sample rather than trusting a generic claim. Marking on chrome, matte paint and glass all behave differently, so one test material never answers the question fully. It also matters that interior surfaces stay light in tone: dark linings hide small objects in low light, and lenses disappear inside them with remarkable reliability.
Takeaway: Write a divider retention threshold with a stated dwell period and a stated load instead of a thickness figure, then require recovery data from the supplier before sample approval.
Access patterns that suit working photographers
Access design is where ranges most often optimise for the shop floor instead of the field, and the cost of that mistake appears only after thousands of users have worked a full day with the product. A layout that displays beautifully with everything perfectly spaced is rarely the one that lets somebody change a lens while standing on wet ground with a bag on one shoulder.
Two access patterns dominate real usage. Side access, where the bag swings around on one strap and a body comes out without setting anything down. And rear-panel access, where the whole insert is exposed for reconfiguration between locations. Both are worth offering where size permits, because they serve genuinely different moments in a working day and photographers will pay for the second one once they have experienced it.
Retrieval should then be validated one-handed, ideally with cold hands and in light rain, because those two conditions expose every compromise that a warm showroom conceals. Ask someone to remove a camera while the pack hangs on one shoulder, since that is the real condition, and count how many operations require a second hand or a surface to rest against. Each one is a usability defect disguised as a feature, and none of them will be discovered by anyone who has only ever opened the product on a table.
Finally, decide whether the insert detaches entirely. A removable unit lets the same chassis serve non-photographic duty, which is precisely the argument for buying a modular platform in the first place, and it converts one product into two use cases at no additional tooling cost. Where it does detach, confirm the insert retains acceptable rigidity when removed, because users will set it down on uneven ground and expect the contents to stay put.
External carry and the packed centre of mass
External carry is where photography ranges quietly become uncomfortable, and it is also where marketing imagery and actual usage diverge most sharply. Every item bolted to the outside moves the packed centre away from the spine, and the further it moves the more muscular effort the wearer spends maintaining posture before any benefit appears.
| Position | Typical item | Effect on balance | Practical limit |
|---|---|---|---|
| Side gusset, low | Tripod or monopod | Mild lateral shift | Keep below the harness anchor line |
| Front panel | Small accessory pouch | Moderate forward shift | Keep compact and close to the panel |
| Top handle area | Rolled jacket or mat | High lever arm | Soft, light items only |
| Shoulder strap mount | Lens change pouch | Low shift, high interaction cost | Keep clear of adjusting buckles |
| Base straps | Tripod horizontally | Low shift but snag risk | Requires a support shelf, not straps alone |
The third row catches out most first attempts. A rolled item above shoulder height creates a lever arm disproportionate to its mass, and it also fouls doorways and crowd clearance, which is the part users complain about most.
Tripod carry deserves specific specification because the load is long, rigid and heavy. Straps alone permit slow rotation and eventually abrade through the very panel they are supposed to protect; a support shelf at the base plus a compression strap higher up keeps it stable, and the retained pull-off force of whatever fitting secures it should be stated rather than assumed. Confirm also that a loaded tripod does not foul the wearer's arm during a stride, since interference is far more common than any structural failure.
Dust, splash and the zip question
Photographic equipment is remarkably sensitive to fine particulate, and outdoor shooting generates plenty of it. A single grain on a sensor can occupy an afternoon in post-production, which is why users care about this far more than any other aspect of the bag. The practical lesson from returned units is that ingress happens at closures rather than through fabric, so that is where specification effort belongs rather than in ever-higher coating weights.
Reverse-coil constructions with covered garages are standard precisely because the coil sits inside and the garage blocks direct deposition. Specify coil gauge, slider type and garage depth, then test rather than assume, using a controlled dust exposure rather than a visual inspection.
Splash requires different evidence. Hydrostatic resistance under AATCC 127 measured on the shell tells you almost nothing about whether water enters through a zip line, so pair it with a shower trial using tissue inside, inspected station by station. Most leakage appears at seam junctions rather than across panel centres, so inspect the corners and the base of any external pocket with particular care. Where a seam has to be sealed, use a bound rather than a taped construction, because tapes eventually lift under repeated flexing and nothing can be resealed in the field.
Then plan honestly for the deluge case. No conventional carry reference of this kind is intended for sustained submersion, and promising otherwise generates returns from users who had every reason to believe the claim. Supply a cover for stationary exposure and say plainly that this is what it is for.
Spec rule: Treat the closure rather than the fabric for ingress, and quote hydrostatic resistance to AATCC 127 alongside a shower trial that locates seam ingress station by station.
Strap interaction, tripod plates and abrasion hotspots
Photographic setups introduce contact points that ordinary carry never sees, and they are harder, sharper and more persistent than anything a general-purpose range will meet. Tripod plates, strap lugs and chrome rings are hard, sharp-cornered and constantly present, so they abrade whatever they rest against, in both directions.
Start with the shoulder strap path. A metal lug pressed against the strap under load will eventually work through the webbing and into the padding, so provide a padded zone positioned to take that contact, not merely additional layers somewhere nearby.
Inside the insert, map where each sharp item actually rests and put reinforcement there. Generic reinforcement everywhere costs weight and helps nobody; reinforcement in three correct places costs grams and solves the problem.
Finally, check strap friction. Photographers frequently carry a second strap across the harness or sling the camera across their chest alongside it, and a hard polished strap surface allows that item to slide constantly, which is both irritating and eventually damaging. A surface with genuine friction solves it cheaply. Review the whole strap path while wearing a representative camera, since lug positions vary enough between manufacturers that a drawing alone rarely predicts where contact will land.
Bottom line: Reinforce the three zones where lugs and plates actually rest and add a padded take-up area on the strap path, because reinforcement everywhere costs weight and helps nobody.
Verification checklist before releasing tooling
Six checks retire most of the risk in this category, and none of them require expensive equipment, though several do require patience because results only appear over time rather than in a single session. Run them in the order listed, since each one narrows what the next needs to test, and record results even where they pass, because reviewed evidence is worth considerably more than remembered evidence. Each maps directly to a return reason that would otherwise surface as a warranty claim rather than a design issue.
First, loaded drop testing with an inert dummy mass matching the heaviest supported configuration, from realistic heights rather than laboratory extremes. Second, compression-set data on every divider material with a stated retention threshold and a named dwell period, since vendors quoting without those two conditions are quoting nothing. Third, dust exposure followed by internal inspection.
Fourth, abrasion cycles reported by position using ISO 12947, with attention to any zone where a lug or plate rests. Fifth, contact abrasion assessment between divider facings and representative equipment finishes. Sixth, seam strength on the insert anchorage using ASTM D5034 for woven assemblies, since this is where accumulated stress concentrates.
Record every result against the reference unit so release later has a baseline to compare against rather than a memory to argue about. Final inspection confirms shipped production matches what was approved; only this checklist establishes whether the approval itself was sound. Add one further item that costs nothing: a loaded walk of twenty minutes with the heaviest supported configuration, checking specifically for insert migration and strap adjustment drift. Both are gradual rather than catastrophic, so no measurement below will ever reveal them.
Judgement: Release tooling after six checks, namely loaded drop, divider compression set, dust exposure, abrasion by ISO 12947, contact marking and seam strength to ASTM D5034, each recorded against the reference unit.
Range arithmetic, quantity and calendar
Photography ranges reward narrowness, which is convenient because the alternative is expensive: every additional variant dilutes attention across patterns the team cannot validate properly. Users buy around the equipment they already own rather than around imaginary future purchases, so two or three size options anchored to realistic kit configurations consistently outsell six variants built around optimistic scenarios. Ask ten owners what they actually carried last weekend and the answer clusters tightly enough to make the decision for you without further research.
Every detachable reference carries MOQ 500, and a moulded insert brings tooling typically between USD 300 and 2,500 depending on cavity count and complexity, which is a real commitment rather than a rounding error. Development units cost USD 50-150 each, credited against the production invoice, and those figures should be modelled honestly against lifetime volume rather than spread optimistically.
Timing then reflects what is in the build. Soft-goods elements fit 6-10 working days, whereas a moulded shell realistically needs 12-15, after which bulk occupies 35-50 days from sign-off. Release operates against a 2.5 acceptance number with defect classes agreed before inspectors arrive, since nobody should be negotiating definitions while goods are waiting to ship.
Freight closes the plan: allow 25-35 days across water for routine volumes, air 5-8 days for genuine shortages, courier 3-5 days for spares and replacement components, then compare realised against forecast after each season. Quotations arrive FOB Xiamen on T/T 30/70, so cash clears against documents rather than arrival, which means the commitment lands several weeks before resale begins. Capacity rarely constrains a photographic range: our vetted partner facilities support up to 200,000 units per month, so genuine schedule risk sits in tooling, approvals and the chosen transport leg rather than in output.
Selection rule: Launch two or three size codes at MOQ 500 each, budget USD 300-2,500 for a moulded insert, and allow sampling 12-15 working days plus mass production 35-50 days.
Frequently asked questions
Should a camera insert be removable from the chassis?
Yes, wherever volume allows. Detaching the unit lets one chassis serve photographic and general duty, which is the entire commercial argument for a platform, and converts one product into two use cases with no extra tooling. Ensure it ties into the shell rather than floating loose, or impacts transfer straight through, and confirm the insert keeps its shape when set down on uneven ground.
What thickness should dividers be?
Thickness matters less than retained thickness. Specify a laminated core with measured recovery and require data on how much original thickness survives a stated dwell period under load, then write a retention threshold into the tech pack rather than judging by hand feel at approval.
How do we prevent gear migrating inside the insert?
Migration happens once dividers take a permanent set, so control compression behaviour rather than adding more padding. Combine that with positive retention and a suspended base so nothing rests on a protruding lens, then verify after hundreds of insertion cycles rather than after ten.
Which access pattern suits working photographers best?
Side access for retrieving a body while the bag hangs on one shoulder, and full rear access for reconfiguration between locations. Validate one-handed retrieval while standing, and count every operation needing a second hand, because each of those is a usability defect.
Where should a tripod be carried?
Low on the side gusset, below the harness anchor line, resting on a support shelf rather than held by straps alone. Straps permit rotation and eventually abrade through. State retained pull-off force for whatever secures it rather than assuming one figure fits every condition.
How do we keep dust out of the main compartment?
Treat the closure rather than the fabric: reverse-coil construction with a covered garage, specified by coil gauge and garage depth, then verified with controlled dust exposure. Fabric air permeability barely matters compared with what arrives through zip lines and seam junctions.
Can we claim water resistance for a photography pack?
Claim shower resistance supported by hydrostatic testing under AATCC 127 with a stated figure, plus a shower trial using tissue inside to locate seam ingress. Supply a cover for stationary exposure and state plainly what it is for. Sustained submersion is not a claim this category can carry.
What should we specify around strap lugs and tripod plates?
Map where sharp components rest and reinforce exactly those zones, which usually means three positions rather than the whole panel. Add a padded take-up area on the strap where metal lugs press under load, and check abrasion by position rather than quoting one fabric figure.
How many size options should a first photography range carry?
Two or three, anchored to genuine kit configurations rather than imagined future purchases. Users buy around equipment they already own, so any additional variant carries MOQ 500 while competing for the same sale instead of opening a new one.
What development timeline applies to a moulded insert?
Moulded shells realistically need 12-15 working days rather than the 6-10 suited to soft-goods elements, and certification or verification should run in parallel rather than afterwards. From sign-off, bulk occupies 35-50 days, then release against a 2.5 acceptance number.
What evidence should be requested on insert anchorage?
Ask for failure load rather than a simple pass or fail, using ASTM D5034 for woven assemblies, and compare against the heaviest supported configuration. Anchorage concentrates accumulated stress from carrying the insert contents, so it is where gradual failures usually begin.
How do we reduce damage to equipment finishes?
Specify a smooth low-abrasion facing and verify by rubbing the actual material against representative finishes rather than relying on a generic claim. Chrome rings, matte paint and rear screens all mark differently, so test against the surfaces people actually carry.
What strap surface suits photographic use?
Something with genuine friction, because photographers commonly carry a second strap across the harness and a polished surface lets it slide constantly, irritating the user and damaging both items. Keep that high-friction zone clear of adjusting hardware too.
What freight and payment assumptions suit a first order?
Allow 25-35 days across water for routine volumes, less than two weeks by air for genuine shortages, and 3-5 days by courier for spares. Quotations come FOB Xiamen on T/T 30/70, so the balance clears against documents rather than arrival, several weeks before resale.