Home › Chest and Waist Systems
Field-tested modular load carriage
Modular Chest Rig and Modular Waist Bag: Fanny Pack Engineering Guide
A modular chest rig and a modular waist bag are front-mounted and hip-mounted carriers that relocate a small, frequently used load set out of a main pack and into the wearer's natural reach; a fanny pack is the same idea reduced to a single belt-mounted pouch. All three succeed or fail on ergonomics rather than capacity, because mass carried on the sternum or on the iliac crest acts through a short lever that the neck, lumbar spine, and gait must absorb. Buyers specifying these platforms should therefore control strap path, anchor geometry, module footprint, packed mass class, and access direction before choosing fabrics or colors. A credible brief also fixes commercial reality early: MOQ 500 per style, sample turnaround of 6–10 working days, and a bulk run of 35–50 days. This page addresses lawful civilian carry only. It covers hiking, photography, field survey, trade tools, first aid, and daily essentials. It does not address weapon carriage, ammunition storage, protective armor, or any military capability, and it claims no approval from any institution.
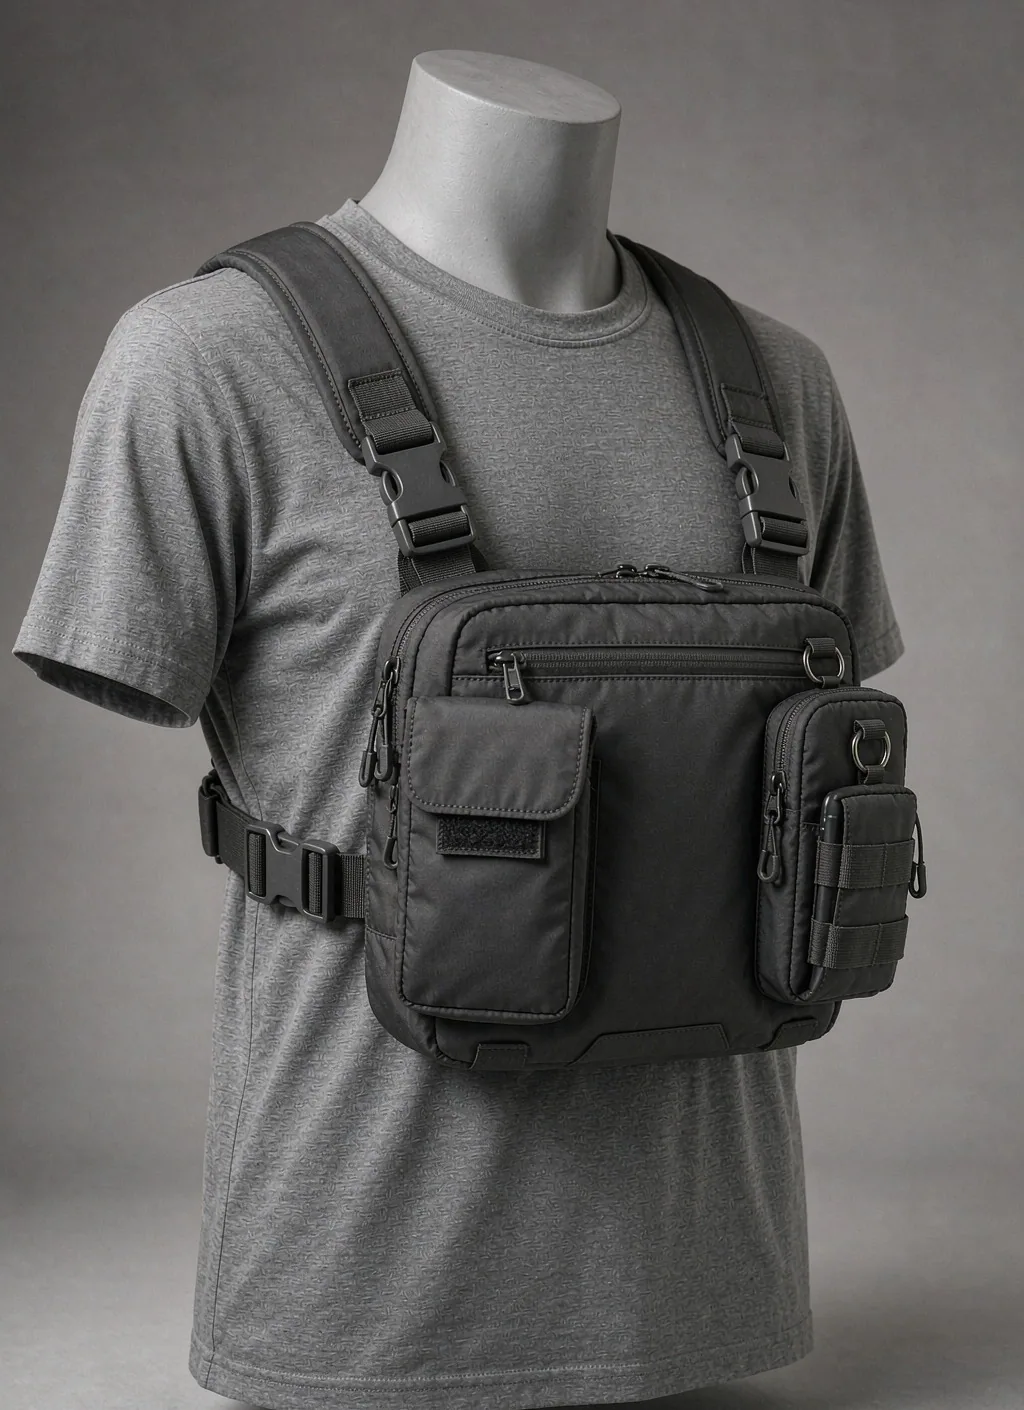
Defining the Carry Envelope: Modular Chest Rig, Modular Waist Bag, and Fanny Pack
A chest-anchored rig sits on the front of the torso and is held there by a harness that passes over the shoulders, around the rib cage, or both. A hip-mounted pouch rides on the iliac crest or slightly forward of it, supported by a belt that closes at the front, side, or back. A fanny pack is the minimal case: one belt, one body, limited organization, and no harness. These three forms share a design problem that a backpack does not have. A backpack transfers most of its mass into the shoulder girdle and, when fitted, into the hips through a structured belt and frame. A front or hip platform has no frame, no long back panel, and no load path into a hip belt unless the program deliberately builds one. Its stability comes from strap geometry, body contact area, and the discipline of keeping the packed mass small. Programs that ignore this end up with a rig that swings, rides up, chafes, or pulls the wearer forward on descents.
Modularity at this scale means something narrower than it does on a backpack. The carrier body is small, so every square centimetre of attachment face competes with body contact and strap routing. A useful definition is that the platform publishes a controlled attachment geometry, an approved module footprint, a stated packed-mass class, and a documented removal sequence. A loop field, a woven panel, a rail, or a buckle receiver can all serve as the interface, provided the program states where the load goes after the module. Adding rows of webbing to a chest panel without tying them into a reinforced spine does not create capacity; it adds weight and stitch perforation to a panel that also has to flex with the rib cage. The honest test is whether the assembled rig still meets access, retention, and comfort requirements when the heaviest approved module is mounted at the furthest approved position.
Front and hip carry earn their place for one reason: access without removal. A photographer working from a tripod, a surveyor moving between sample points, a technician on a ladder, and a hiker managing snacks, maps, and a first-aid kit all need items several times an hour. Reaching a chest or hip pouch takes one hand and about a second. Reaching the same item inside a backpack requires stopping, removing the pack, opening a compartment, and re-shouldering. That difference is the commercial argument. It is also the engineering constraint, because a platform optimized for access tends to spread modules across a wide frontal arc, and a wide frontal arc increases snag exposure, interferes with arm swing, and moves mass away from the spine where the body tolerates it best.
The envelope should be written as a planning band rather than a fixed specification. Volume is dictated by the approved module set, not by marketing; mass class is dictated by the tested configuration; and strap width, contact area, and anchor count follow from the mass class. Programs often start with a base body, then derive chest, waist, and sling variants from shared panels and shared trim. That approach works when the anchors are defined once and reused, and it fails when each variant invents its own bracket. Teams extending a rig into a broader range should align it with modular everyday carry planning so that pouch footprints, organizer panels, and attachment rows stay common across the catalog instead of fragmenting into incompatible sub-lines.
| Carry position | Support surface | Access character | Dominant comfort risk | Fit variable to specify first |
|---|---|---|---|---|
| Chest, harness-mounted | Sternum and upper rib cage, stabilized by shoulder and rib straps | Two-hand work directly under the eyes, fastest repeat access | Chest expansion limits, neck loading from high strap paths, and forward pitch on descents | Harness strap path relative to the trapezius and the sternum anchor height |
| Chest, slung from one shoulder | One shoulder plus a diagonal body contact line | Rotates to the front for access, then parks at the side or back | Unilateral shoulder loading and rotational drift during gait | Diagonal strap angle and the anti-rotation anchor at the rear hip |
| Hip, centred at the back | Lumbar region and the top of the pelvis | Blind access behind the body, suited to low-frequency items | Pressure on the lumbar spine when seated, and belt ride-up on steep grades | Belt line relative to the iliac crest and the seat-back contact zone |
| Hip, rotated to the front | Iliac crest and the front of the pelvis | One-hand access with the pouch rotated forward | Belt rotation under load and pressure on the abdominal wall when bending | Belt friction, buckle position, and the rotation stop built into the panel |
| Hip, cross-body on a long strap | Opposite shoulder with the pouch at the contra-lateral hip | Fast swing-to-front access with both hands free afterwards | Strap slip off a sloping shoulder and pendulum motion while walking | Strap length adjustment range and the shoulder pad's grip behavior |
Ergonomics of Front and Hip Carry: Center of Mass, Breathing, Arm Swing, and Sight Lines
Center of mass is the first calculation. A backpack places load close to the spine and, when the suspension is competent, moves a large share into the pelvis. A chest rig places load in front of the spine, so any forward mass creates a moment that the lumbar extensors and, at higher strap paths, the cervical musculature must resist. The moment grows with both mass and horizontal distance from the spine. It is amplified by gait: on every heel strike the frontal load accelerates downward, then rebounds, and the harness has to absorb a cyclic component that a static fitting never reveals. This is why a chest platform that feels acceptable while standing can become tiring after an hour of walking. The practical response is to keep dense modules close to the torso, place soft and compressible items in the outer layer, and set the packed mass class from a tested configuration rather than from pouch volume.
Breathing sets a hard geometric limit on chest rigs. The rib cage expands both upward and outward during exertion, and a harness that is comfortable at rest can restrict deep inhalation on a climb. Restriction is rarely dramatic; it shows up as shallow breathing, earlier fatigue, and a wearer who loosens the harness and then suffers sway. The design response is to place the horizontal restraint where the rib cage moves least, to route the shoulder straps so they do not compress the upper chest, and to provide enough adjustment that a user can set the rig for rest and for exertion. Programs should evaluate the harness with the wearer at an elevated heart rate, not only standing still. A rig intended for hiking or trail use should be checked on an actual grade, because the combination of incline, arm swing, and deeper breathing exposes fit problems that a showroom fitting hides.
Arm swing and sight lines are the two constraints most often missed. A frontal module that sits high and wide will meet the upper arm during a normal stride, particularly when the wearer is also carrying poles or a tool. The contact is repetitive, and over an hour it becomes abrasion on both the arm and the module edge. Designers should map the swing envelope with the wearer's actual clothing layers, then keep high-frequency modules inside it and push bulky or occasional items lower and closer to the body. Sight lines matter for safety-critical tasks. A chest rig that sits too high blocks the view of the feet on technical ground and forces the wearer to lean further to see a work surface. A rig that sits too low forces the head down and loads the neck. The acceptable band is narrow, and it should be defined in the tech pack with a measured strap length range rather than left to the user.
Seated and vehicle posture deserves its own check. Front-mounted mass meets a steering wheel, a desk edge, a harness in a vehicle, and a seat back in an aircraft. Hip-mounted mass meets the seat belt buckle and the lumbar contact point, and a rear-centred pouch becomes a pressure point on a long drive. A rig intended for travel or commuting should therefore specify a quick-release path that lets the user move the whole platform off the torso within a few seconds, and should state whether the pouch is expected to stay on during seated use. These checks are cheap to run and they prevent the most common field complaint, which is not breakage but the discovery that the rig must be removed every time the wearer sits down.
| Body region | Motion that exposes the problem | Observable symptom in the field | Design response | Verification activity |
|---|---|---|---|---|
| Cervical spine and trapezius | High strap path combined with frontal mass on a descent | Neck ache, shoulder shrugging, and a wearer who keeps re-setting the harness | Lower the load line, widen the shoulder contact, and cap the frontal mass class | Inclined treadmill or graded trail session with the heaviest approved module mounted |
| Rib cage and diaphragm | Sustained exertion with deep inhalation | Shallow breathing and deliberate harness loosening | Place horizontal restraint on a low-motion band and provide staged adjustment | Elevated-effort fit session with recorded strap settings before and after |
| Upper arm and shoulder | Normal stride, pole planting, or overhead reach | Scuffing on the module edge and avoidance of a normal arm swing | Pull high-frequency modules inside the swing envelope and soften outer edges | Marked swing-arc check with the seasonal clothing layer worn |
| Lumbar spine | Seated use with a rear-centred hip pouch | Localized back pressure and a wearer who removes the pouch in vehicles | Shift the pouch off the spinal line and reduce rear protrusion | Seated trial in the target vehicle or seat type with the full load set |
| Pelvis and iliac crest | Belt ride-up on steep grades and rotation under a front-mounted load | Constant re-centring of the pouch and belt creep toward the waist | Increase belt contact friction and add a rotation stop tied to the panel | Grade walking with the pouch loaded to the top of its approved mass class |
Module Distribution and Handedness Across the Chest and Hip Arc
Handedness should be decided before the panel is patterned. A right-handed wearer reaches across and slightly down with the dominant hand, and the fastest motion is one that ends with the wrist in a neutral position and the fingers closing on a pull that already faces the correct direction. On a chest rig, that argues for the dominant-hand side carrying the items reached most often, with the non-dominant side carrying either mirrored storage or a single larger module that is opened with two hands. On a hip pouch, the same logic places the primary opening on the side the hand falls to naturally, and it determines whether the zipper travels toward or away from the body. Programs that ignore handedness produce rigs that are technically functional and practically slow, because every access requires a wrist rotation or a second hand to stabilize the body.
Access frequency deserves its own tiering. The first tier is reached many times per hour and must be openable with one hand, without looking, and without disturbing anything else: a lens cloth, a rangefinder, a multi-tool, a snack, a compact first-aid item. The second tier is reached a few times per hour and can tolerate a two-motion opening. The third tier is reached once or twice a day and should be placed where it does not compete for space, typically low, rearward, or inside the main body. Mapping tiers onto physical zones is more useful than counting pockets. A rig with six pouches that all sit in the first-tier zone is worse than a rig with three, because the wearer has to search a crowded frontal arc for every item and the outer pouches are the ones that catch on obstacles.
Symmetry is a real cost decision. A mirrored left-hand variant doubles pattern work and complicates inventory, but a handed rig sold into a market with a roughly one-in-ten left-handed population creates a measurable complaint rate and a return stream. The common compromise is to make the body symmetric and the modules reversible: pouches that can mount on either side, zippers with pulls at both ends, and organizer panels that rotate. That approach keeps one body panel in the range while giving left-handed users a workable layout. Where a program does commit to a handed layout, the tech pack should state the assumption explicitly, because a distributor selling into a different market cannot fix it later.
Retention and access pull in opposite directions, and the balance point differs by task. A rig used while bending, scrambling, or working overhead needs positive closure on every module, because gravity and body rotation will open a zipper that only has friction holding it. A rig used mostly standing can trade some retention for speed. The practical specification is per-module: state the closure type, the direction of the pull, whether the closure is self-locking under load, and whether the module stays usable if the closure fails. Elastic keepers, silent pull tabs, and molded garage ends all reduce the noise signature that makes a rig unpleasant in quiet environments. That noise control matters for photography and wildlife observation, and it is also a quality signal: a rig that rattles reads as cheap regardless of its material specification.
| Reach tier | Preferred zone on a chest rig | Preferred zone on a waist platform | Closure requirement | Layout caution |
|---|---|---|---|---|
| First tier, many times per hour | Dominant-hand side of the frontal arc, below the collar and inside the arm swing envelope | Front quarter of the belt arc on the dominant-hand side | One-hand opening with a self-locking pull and a positive stop | Do not stack two first-tier pouches on the same side; the wearer will search instead of reach |
| Second tier, several times per hour | Central lower frontal band, close to the torso | Side quarters of the belt arc, either hand | Two-motion opening acceptable, with the pull direction stated in the tech pack | Keep the packed depth low so the pouch does not press into the abdominal wall when bending |
| Third tier, once or twice daily | Inside the main body or on the rear of the harness | Rear quarter of the belt arc, off the spinal line | Full closure with a secondary restraint for loose contents | Avoid rear protrusion that becomes a seated pressure point |
| Reserve or emergency tier | High-visibility location with a dedicated pull, never behind another module | Front centre with a contrasting pull and a clear label field | Immediate release that cannot be blocked by an adjacent pouch | Access must not require removing any other module first |
| Tools with sharp or abrasive geometry | Close to the torso, in a sleeve with a reinforced floor | Internal divider rather than an external pocket | Full enclosure with edge protection and a lint-resistant lining | Never share a compartment with soft items, screens, or optics |
Coexistence with a Backpack: Strap Interference, Back-Panel Conflicts, and Load Sharing
Most chest and waist platforms are bought to work alongside a main pack, not to replace it. That assumption should drive the interface review. The first conflict is the shoulder strap. A backpack strap occupies the top of the shoulder and runs down to a sternum strap; a chest harness wants the same territory. If both are wide and both sit at the same height, the combination bunches, the sternum strap becomes unreachable, and one of the two systems ends up misadjusted. The remedy is geometric: define in the tech pack where the harness crosses the pack strap, keep the harness narrower at the crossing point, and make sure the sternum strap can still slide. Programs that sell both a pack and a rig should test them together as one assembly, because the combined fit is what the customer experiences and neither component's individual fitting predicts it.
The second conflict is the hip belt. A backpack hip belt wraps the iliac crest with a stiffened, padded structure. A waist pouch wants the same band. Wearing both means either the pouch goes above the belt, where it interferes with the pack's compression and lumbar pad, or below it, where it sits on the thigh and rotates. The workable options are to design the pouch to mount on the belt itself using a controlled sleeve or attachment face, or to place it forward of the belt on the abdominal quarter where the two structures do not overlap. Each option changes the load path, so each needs its own retention verification. A pouch mounted on a loaded hip belt is subject to the belt's tension and to the pack's motion, which is a different environment from the same pouch worn alone.
Load sharing is the one genuine benefit of combining front and rear carry. A front load partially counteracts a rear load, moving the combined center of mass closer to the spine and reducing the backward pull that makes a heavy pack feel unstable. That benefit has a limit. It holds while the frontal mass stays modest and close to the torso; it reverses once the frontal mass becomes large, because the frontal moment then exceeds the counterbalance and the wearer is pulled forward. The practical guidance for a range is to state the frontal mass class in the tech pack, to test the combined configuration at the top of that class, and to instruct the user to keep dense items in the main pack rather than in the rig. This is also where a modular hiking backpack program benefits from a shared mass-class definition, so a buyer can predict how a given rig behaves when paired with a given pack.
Access sequence is the fourth check and the one most often skipped in development. With both systems worn, the wearer needs to know what can be reached without removing anything, what requires opening the pack, and what requires taking the rig off. Hydration hose routing, microphone or cable routing, rain cover access, and the pack's own compression straps all pass through the frontal zone. A hose routed over a chest pouch drips onto it; a compression strap routed across a pouch buckle makes the buckle hard to release; a rain cover that wraps the pack may not clear a wide frontal rig. The specification should include a combined-configuration drawing showing strap paths, hose paths, and clearance zones, and the acceptance sample should be inspected in that combined state rather than component by component.
| Conflict location | Symptom when both systems are worn | Root cause | Resolution route | Evidence required before release |
|---|---|---|---|---|
| Shoulder strap crossing | Bunching at the shoulder and an unreachable sternum strap | Two wide straps competing for the same height on the trapezius | Narrow the harness at the crossing and define the crossing height in the drawing | Combined fit session with photographs at three torso lengths |
| Sternum strap zone | Chest rig body covers the pack's sternum buckle | Frontal module height overlapping the pack's closure band | Restrict module height in the upper frontal band or move the closure | Combined adjustment test with the pack loaded to its stated class |
| Hip belt overlap | Pouch rides up, rotates, or presses into the lumbar pad | Two structures claiming the iliac crest band | Mount the pouch on the belt through a sleeve, or move it to the front quarter | Grade walking with the combined system at the top frontal mass class |
| Compression strap path | A pack strap crosses a pouch buckle and jams the release | Straps routed without regard to module positions | Define reserved routing corridors in the combined drawing | Release-force check with the strap routed in its production position |
| Hydration and cable routing | Drip onto a frontal pouch or a snagged hose | No defined hose corridor in either component | Add a routing channel and state the accepted hose diameter range | Walking session with a filled reservoir logged for drip and snag |
Conversion Interfaces: From Modular Waist Bag to Chest Rig to Sling Carry
Conversion is the strongest commercial argument in this category and the most common source of structural disappointment. A waist pouch carries its load downward into a belt that wraps the pelvis; the anchors are loaded in roughly the belt's own plane. Converted to chest carry, the same pouch hangs from a harness and the load acts vertically on anchors that were patterned for a horizontal belt. Converted again to a sling, the load acts on a single diagonal strap and the pouch is free to rotate and pendulum. Three carry modes therefore impose three different force paths on the same anchors, and the anchors must be specified for the worst one. Programs that treat conversion as a strap accessory rather than a structural change produce products that work in one mode and sag, spin, or tear in the others.
The interface decision has three parts. The first is anchor geometry: how many anchors, where they sit relative to the pouch's packed center, and whether they are on the same plane as the load or offset from it. Anchors placed above the packed center reduce rotation; anchors placed at the corners control sway but can concentrate stress at a seam. The second is the mating family: a controlled buckle pair, a woven panel, or a rail. Woven panels built to PALS rows spaced at 38 mm vertically with a 50 mm horizontal repeat, woven from 25 mm webbing, give predictable placement and a wide ecosystem, but they add threading time and material. Buckle receivers are faster and lighter, yet they only behave as specified when both halves come from an approved, matched family. The third is the load path: the strap or harness must return force into a reinforced spine, backing layer, or structural seam rather than into the pouch's face textile alone.
Quick-release is a requirement in almost every brief and a risk in almost every design. A release that is easy to find and easy to operate is also easy to open accidentally when the rig brushes an obstacle or when the wearer leans against a surface. The resolution is directional: put the release where the hand expects it, protect it with a small guard or a recess, and require a deliberate two-part motion for the primary release while letting a secondary strap carry residual load if the primary opens. Programs should also decide whether the rig must be removable without lifting it over the head, because that decision changes the harness architecture completely. A rig that opens at one shoulder and swings off is a different pattern from one that steps over the head, and the choice should be made before sampling rather than during it.
Standardizing the conversion interface across a range is where the margin is. If the chest body, the waist body, and the sling variant all use the same anchor pitch, the same buckle family, and the same harness receiver, then one harness SKU serves all three bodies and the buyer can mix configurations from existing stock. That requires an interface control drawing with datums, tolerances, approved hardware references, and a change record, and it requires resisting the temptation to alter the anchor for styling reasons. Where programs want a wider ecosystem, publishing the geometry while reserving high-consequence positions for approved modules is a defensible middle path. Teams extending the same geometry into packs should reference MOLLE attachment geometry so that pouch footprints stay transferable between the chest platform and the larger carriers in the range.
| Conversion route | Force direction change | Anchor requirement | Interface option | Failure if left unspecified |
|---|---|---|---|---|
| Waist bag to chest rig | From in-plane belt tension to vertical hang on the same anchors | Anchors tied to a reinforced spine, positioned at or above the packed center | Harness receivers, woven rows, or a combination with a defined backup | Pouch rotates forward and the upper anchors peel away from the face textile |
| Chest rig to sling | From symmetric shoulder support to a single diagonal line | A rear anti-rotation anchor plus a wide, low-slip shoulder pad | Single diagonal strap on a swivel with a controlled buckle pair | The body spins under the arm and the strap slips off a sloping shoulder |
| Waist bag to cross-body | Belt friction replaced by strap tension across the torso | Strap ends anchored into structural seams, not into binding | Long adjustable strap with a matched buckle set at each end | Pendulum swing while walking and progressive stitch elongation at the ends |
| Chest rig to pack-mounted panel | From body-worn support to attachment on a larger carrier | Attachment rows aligned with the host panel's own reinforcement | Woven rows at the controlled pitch, or a buckle plate if the host defines one | Panel detaches under peel because the host field was never verified for the load |
| Any mode to hand carry | Static support replaced by a single-point grab load | A grab point rated for the packed mass with a reinforced return path | Webbing loop sewn into a structural seam rather than a face patch | The grab loop tears out when the rig is lifted by the pouch body |
Load Ceilings and the Structural Reason Chest and Waist Rigs Stay Light
The load ceiling for a chest or waist platform should be a test-derived value, not a catalog number. Buckle suppliers publish component ratings, but a component rating describes the buckle in a fixture. The assembly limit is set by the weakest link in the chain: module textile, stitch pattern, webbing, backing layer, carrier panel, anchor seam, strap, and the body contact that has to absorb the resulting moment. Even a high-rated buckle stitched onto a pouch with little backing will fail by fabric tear well before the hardware reaches its published figure. A load ceiling written into a specification without naming the tested configuration is therefore meaningless, and a buyer should treat any such figure as a claim rather than as evidence.
The mechanical reason these platforms stay light is leverage. Frontal mass acts at a horizontal distance from the spine, so the same item carried at the chest creates several times the spinal moment it would create in a well-fitted backpack. Hip-mounted mass acts closer to the body but loads the pelvis asymmetrically if it is rotated forward, and it is subject to ride-up because the pelvis is not a stable shelf during gait. Both positions also lack the damping that a framed suspension provides. Every step applies a cyclic load to straps and anchors, and the cyclic component drives fatigue in stitches and in the textile around needle holes. Fatigue failures appear without warning and usually at a seam edge, which is why the fatigue check matters more than a single static pull for this category.
Dense contents deserve specific rules. A compact, heavy object such as a camera body, a lens, a battery block, or a tool roll concentrates mass in a small volume and creates a high local moment on its anchors. The correct response is not a heavier fabric; it is placement. Dense items belong close to the torso and close to the anchor line, with soft and compressible items layered outside them. The tech pack should state the accepted content type per module and give the user packing guidance, because a rig that is stable with clothing becomes unstable with the same volume of metal. Programs should also mark the secondary restraint clearly: a strap that stops sway is not the element carrying the module, and confusing the two is a recurring cause of field failure.
How the ceiling is verified should be stated in the same document as the ceiling itself. The record needs the module identity, the surrogate or actual contents, the mounting position, the closure and weaving procedure, any conditioning, how the carrier or body form was supported, the loading direction, the endpoint definition, and the observed damage. Acceptance criteria can include no release, no seam propagation beyond a stated limit, no lasting deformation that obstructs access, and full function once the load is removed. Because the value depends on all of those variables, the honest way to publish it is as a verified result for a named configuration. A buyer comparing two rigs should ask for that record rather than for a number, and a program that cannot produce it has not actually established a ceiling.
Civilian Scope Boundary: Lawful Civilian Carry Only, With No Defense or Armor Claims
Every chest rig, modular waist bag, fanny pack, and sling configuration described on this page is a lawful civilian carry platform. The intended uses are hiking and trail activity, photography and observation, field survey and mapping, trade and maintenance tools, first-aid and personal safety kits, and daily personal essentials. Product copy, hangtags, packaging, and distributor material should describe those uses and nothing beyond them. This boundary is not a stylistic preference; it determines which materials, claims, markets, and review routes are appropriate, and it protects both the brand and the buyer from statements that cannot be supported.
The following subjects are outside the scope of this page and outside the scope of the products it describes: weapon carriage and any holster, scabbard, or retention device intended for a firearm; ammunition storage or transport; ballistic protection, protective armor, armor plate pockets, and any construction described as plate carrier class; and any claim of military capability, military specification compliance, or military adoption. No statement on this page asserts or implies approval, certification, endorsement, testing, contract award, or adoption by any defense organization, law-enforcement agency, or government institution. Where a standard is referenced, it is a civilian or industrial test method used as a verification tool, not as evidence of institutional acceptance.
Reviewing claim language should be a scheduled gate rather than an afterthought. Brand teams should maintain a prohibited-claims list covering armor, ballistic, weapon, and institutional terms, and should apply it to artwork, listings, retail copy, and marketplace attributes as well as to the tech pack. Distributor and marketplace copy is the highest-risk surface because it is often written by parties who have not seen the engineering file. The practical control is to supply distributors with an approved vocabulary that describes capacity, organization, materials, test methods, and lawful civilian uses, and to require that any claim beyond that vocabulary be cleared before publication. Where a market requires specific markings or documentation, the requirement belongs in the compliance file, not in a marketing attribute.
Design work should follow the same boundary. Hardware, panels, and pockets should be engineered for the stated contents: optics, tools, cables, documents, water, nutrition, and first-aid supplies. Where a customer request touches an excluded subject, the correct response is to decline the configuration and document the reason, rather than to reinterpret it into a permissible description. That discipline also improves the product, because a rig designed around a real civilian load set is lighter, quieter, and better balanced than one patterned around a shape it is not permitted to serve. Programs that keep the boundary clean also find compliance review, retailer onboarding, and customs classification more predictable.
Webbing, Buckles, and Padding: Trim Selection for Chest and Waist Platforms
Webbing is the structural language of this category, and it should be specified as a system rather than purchased as a commodity. The same tape performs differently depending on weave, finish, edge treatment, and how it is sewn. A tape that is stiff enough to thread easily may be too stiff to conform to the rib cage; a soft tape may be comfortable and may also slip through an adjuster under cyclic load. The specification should cover width, material, breaking strength evidence, abrasion behavior, colorfastness, and the adjuster family it is paired with, because webbing and hardware are tested as a set. Where rows are used for module attachment, the controlled pitch matters: rows spaced at 38 mm vertically with a 50 mm horizontal repeat, woven from 25 mm webbing, give predictable module placement. Where webbing is used as a belt or harness, the width and the anchor stitching decide how the load returns into the body panel.
Buckles should be controlled by exact family and by matched halves. Quick-release hardware sourced from a named ITW/Nexus, Duraflex, or Woojin reference delivers the tactile click users expect and allows straps to be swapped later, although two parts that merely look alike are not proof that they latch securely together. The tech pack should name the supplier, the family, the size, the mating half, and the approved substitutes, and it should require a mating check at incoming inspection. Ladderlock and cam hardware suit adjustment points where the user sets length once; side-release suits closures opened frequently; and a guided magnetic closure can improve alignment where its orientation and backup retention are defined. Acetal hardware keeps mass low and resists corrosion; metal hardware adds perceived quality, adds mass at the worst possible location on a chest rig, and requires review for conductivity, thermal behavior, and nickel release under EN 1811.
Padding is where comfort claims are won or lost, and it is frequently mis-specified. A thick, soft foam feels good in a showroom and collapses under load, after which the strap edge becomes the contact point and comfort is worse than with a thinner, firmer material. The correct approach is to specify the function first: spread pressure, maintain a ventilation channel, resist sweat uptake, or protect the body from a hard module edge. Closed-cell foam spreads pressure and resists water; spacer mesh maintains airflow but compresses; and a laminated sandwich can do both if the layers are bonded for the life of the product rather than for the first month. Edge treatment matters as much as the core, because most strap complaints are about edges, seams, and bindings rather than about the foam itself.
Trim is also where chemical compliance is decided. Metal parts need nickel release review under EN 1811; all materials need restricted-substance review under REACH (EC 1907/2006); programs sold into the United States need California Prop 65 and CPSIA considerations for the intended user group; and textiles in contact with skin are commonly specified to OEKO-TEX Standard 100. Salt from sweat, sunscreen, insect repellent, and sunscreen-contaminated dust all accelerate degradation of coatings and dyed tapes, so the conditioning step in validation should include a credible contamination exposure rather than only clean laboratory handling. Noise control belongs here too: zipper garages, molded pulls, elastic keepers, and hook-and-loop silencers should be specified by part number, because a quiet rig is a repeated purchase driver in photography and observation markets. Programs planning multiple colorways from shared panels should follow the custom modular bag development path so that trim substitutions are validated rather than assumed.
| Component | Selection question | Common specification error | Service-life watch point | Evidence to request |
|---|---|---|---|---|
| Webbing tape | Does the tape conform to the body while resisting adjuster slip under cyclic load? | Specifying strength alone and ignoring hand, stiffness, and adjuster pairing | Polishing at adjuster contact, yarn damage, and color loss from sunscreen | Tensile evidence to ASTM D5034 plus an adjuster-slip check with the paired hardware |
| Side-release buckle | Are both halves from one approved family and verified as a matched pair? | Accepting a similar silhouette without a mating and engagement check | Partial engagement, debris in the gate, and wear at the strap slot | Mating and release-force record on the production strap assembly |
| Adjustment hardware | Does the adjuster hold its set through gait, sweat, and repeated re-setting? | Choosing hardware by appearance rather than by slip behavior on the chosen tape | Gradual length creep during a long walk | Cyclic adjustment and creep log with the production tape |
| Strap padding | Is the foam specified to spread pressure after compression, not only at first touch? | Over-specifying thickness and under-specifying compression set | Collapse of the core and exposure of the strap edge | Compression and recovery check plus a fitted wear trial |
| Contact lining | Does the lining manage sweat and resist abrasion from clothing layers? | Ignoring how the lining behaves when wet and salt-contaminated | Odor retention, pile matting, and abrasion at the arm swing contact | Abrasion evidence to ISO 12947 or ASTM D3884 with wet conditioning |
| Closure and pull parts | Is the noise signature acceptable for the intended environment? | Adding silent pulls after sampling rather than specifying them in the tech pack | Lost pull tabs, stretched keepers, and hook wear at the mating field | Cycle count on the closure with the pull fitted as production |
Validation, Failure Modes, and Commercial Terms for Chest and Waist Programs
A validation plan for this category should follow the way the product actually fails. Static pull on the primary axis is the starting point, not the conclusion, because most field failures in front and hip carry come from peel at an exposed corner, cyclic fatigue at a stitch line, adjuster slip, or a closure that opens under body rotation. The sequence should therefore include primary-axis pull, edge peel at the vulnerable corner, angled snag simulation, cyclic strap adjustment, loaded closure cycling, and a fitted wear trial on the intended terrain with the heaviest approved module mounted. Conditioning should reflect credible service: sweat and sunscreen contamination, dust, a wet-dry cycle, and storage with a module attached. An unused laboratory sample establishes a helpful reference point, yet it says little about behavior after a season of service.
Laboratory methods should be chosen for the question they can actually answer. ASTM D5034 informs textile tensile evidence, although a tensile figure on its own says nothing about stitch pull-out or peel. ASTM D751 covers coated fabrics where a laminated panel or a coated base is used. AATCC 127 addresses water resistance under a hydrostatic head, and it should be understood as a material test rather than as a promise about a finished product in rain. Abrasion behavior can be characterized through ISO 12947 or ASTM D3884, color transfer through AATCC 8, home laundering through ISO 6330, and corrosion of metal parts through ASTM B117 where hardware is exposed to salt. Transit packaging should be validated to ISTA 3A for the actual carton and pack-out. None of these replaces an assembled test on the rig itself; together they describe materials, while the assembled test describes the product.
Inspection and release need defined gates. Incoming material should be checked against the approved trim list, with hardware verified for family and mating rather than for appearance. In-process checks should cover stitch density, bar-tack placement, webbing overlap, backing alignment, and edge finishing, because a rig's structural margin is concentrated in a small number of operations. Final inspection is commonly run at AQL 2.5 with sampling tables from ISO 2859-1, and the acceptance record should include functional checks that a visual inspection misses: buckle engagement, adjuster slip, zipper tracking under load, and the module mounting procedure performed as the user would perform it. Packaging checks should confirm that the rig ships without permanent creasing at strap folds and that the packed configuration matches the instruction sheet.
Commercial terms should be fixed before development starts, because they shape design decisions. Programs are quoted on MOQ 500 per style. Sample turnaround is 6–10 working days, extending to 12–15 working days for complex builds, and a bulk run takes 35–50 days. Payment is structured as T/T 30/70, and any figure discussed is indicative only, quoted FOB Xiamen against the 500-unit MOQ. Capacity planning references 200,000 units per month across 7 production lines, 149 machines, and 137 people on a 4,950 m² SGS-verified production floor. Shipment options are sea freight 25–35 days, air 5–8 days, and courier 3–5 days, so a launch date should be back-solved from the slowest leg the plan depends on. Social compliance and quality systems are documented through BSCI and ISO 9001, and our production team can run development, testing, and release from our SGS-verified production base or from our vetted partner facilities depending on the program's construction. Buyers reviewing the current chest and waist carrier range should request the interface drawing and the verification record together, since neither document is meaningful without the other.
| Gate | Question the gate answers | Method reference | Record produced | Release condition |
|---|---|---|---|---|
| Material qualification | Do textile, coating, webbing, and hardware meet the specification before cutting? | ASTM D5034, ASTM D751, AATCC 127, ISO 12947, ASTM D3884 | Material test reports tied to lot identification | Results inside the specification, with deviations approved in writing |
| Attachment verification | Can the assembled module resist pull, peel, and snag in its approved position? | Project method on the assembled rig with the named configuration | Load and displacement record, failure origin, and photographs | No release and no safety-critical seam propagation within the envelope |
| Wear trial | Does the rig remain comfortable and stable on the intended terrain? | Fitted session on a graded route with the heaviest approved module | Logged strap settings, contact marks, and user observations | No chafe, no uncontrolled rotation, and no need to re-set the harness repeatedly |
| Closure endurance | Do buckles, zippers, and adjusters survive the planned service life? | Cycled closure and adjustment on production-representative samples | Cycle count, failure point, and post-cycle function check | Function retained with no partial engagement or creep beyond the agreed limit |
| Compliance file | Are restricted-substance and marking requirements met for the target markets? | REACH (EC 1907/2006), EN 1811, California Prop 65, CPSIA, OEKO-TEX Standard 100 | Declarations, test reports, and artwork proof | All declarations current and matching the shipped bill of materials |
| Final inspection | Does the shipped lot match the approved sample and the functional criteria? | AQL 2.5 using ISO 2859-1 sampling tables | Inspection report with defect classification and photographs | Lot accepted under the agreed defect classification and tolerance |
| Transit validation | Will the carton and pack-out protect the product through distribution? | ISTA 3A on the production carton | Transit test report and post-test product inspection | No product damage and no permanent strap creasing attributable to pack-out |
Frequently asked questions
What is the difference between a modular chest rig and a modular waist bag?
A chest rig is anchored to the front of the torso by a shoulder and rib harness, so its load acts forward of the spine and is stabilized by strap geometry and body contact. A modular waist bag rides on the pelvis and is stabilized by belt friction and the iliac crest. The chest position gives faster visual and two-hand access; the hip position is cooler and less restrictive for breathing. Both should be specified with a packed-mass class rather than only a volume.
How much weight should a chest rig or waist bag be allowed to carry?
The ceiling must come from a test on the assembled configuration, not from a buckle catalog. Component ratings describe hardware in a fixture, while the assembly limit is set by the weakest link across module textile, stitching, webbing, backing, panel, anchor seam, and strap. Publish the value with the named configuration, mounting position, conditioning, and endpoint. Ask suppliers for that record rather than for a bare number.
Why should front and hip platforms stay light even when the hardware is strong?
Leverage, not hardware strength, sets the limit. Frontal mass acts at a horizontal distance from the spine, so the same item creates a much larger spinal moment than it would in a fitted backpack. Gait adds a cyclic component that fatigues stitches and the textile around needle holes. Fatigue failures appear without warning at seam edges, which is why a cyclic check matters more than a single static pull in this category.
Can a modular waist bag be converted into a chest rig?
Yes, but the anchors must be re-specified. In waist carry the load acts in roughly the belt plane; in chest carry it hangs vertically from the same anchors. That change requires anchors tied into a reinforced spine, positioned at or above the packed center, plus a verified harness receiver. Treat conversion as a structural change and test the worst-case mode rather than selling a strap accessory.
What PALS geometry should a chest panel control?
The tech pack should call out 25 mm webbing, a 38 mm vertical row pitch, and a 50 mm column repeat, then add row alignment, stitch placement, backing construction, and usable clearance. Geometry only establishes fit. Confirmed capacity depends on the finished body, the module, the weaving method, the reinforcement behind the rows, and the packed condition. If the rows are decorative, or if they are stitched to an unbacked outer skin, the join will not hold the approved module.
How do we stop a chest rig from fighting a backpack's shoulder straps?
Define the crossing point. Keep the harness narrower where it crosses the pack strap, fix the crossing height in the combined drawing, and confirm the pack's sternum strap still slides and releases. Then test the two systems together as one assembly, because combined fit is what the customer experiences and neither component's individual fitting predicts it. Photograph three torso lengths during the session.
Where should a hip pouch sit when the wearer also uses a backpack hip belt?
Two workable positions exist: mount the pouch on the belt through a controlled sleeve, or move it forward to the abdominal quarter where the two structures do not overlap. Placing it above the belt interferes with compression and the lumbar pad; placing it below puts it on the thigh where it rotates. Each option changes the load path, so each needs its own retention verification.
How should handedness be handled in module layout?
Decide it before patterning. Put first-tier items on the dominant-hand side of the frontal arc, inside the arm swing envelope, with the zipper pull travelling toward the reaching hand. The cheapest compromise for a range is a symmetric body with reversible modules, dual-end pulls, and rotatable organizers, which serves left-handed users without doubling the pattern count or fragmenting inventory.
Are chest rigs and waist bags covered by any military or institutional approval?
No. Nothing on this page asserts or implies approval, certification, endorsement, contract award, or adoption by any defense organization, law-enforcement agency, or government institution. Referenced standards such as ASTM D5034, AATCC 127, and ISO 2859-1 are civilian or industrial test methods used as verification tools. Product copy should describe lawful civilian uses and nothing beyond them.
What civilian uses should product copy describe for these platforms?
Hiking and trail activity, photography and observation, field survey and mapping, trade and maintenance tools, first-aid and personal safety kits, and daily personal essentials. Copy should address capacity, organization, materials, and verified test methods. Weapon carriage, ammunition storage, ballistic protection, armor pockets, and any claim of military capability or institutional acceptance are outside scope and should be blocked by a written prohibited-claims list.
Which buckle families suit chest and waist straps?
Use a controlled family with matched halves drawn from a named ITW/Nexus, Duraflex, or Woojin reference, and record the supplier, size, mating half, and permitted substitutes in the tech pack. Side-release suits frequently opened closures; ladderlock suits set-once adjustment points. Verify mating at incoming inspection, because a similar silhouette is not evidence of reliable engagement. Metal parts add mass at the worst location and need EN 1811 review.
How is noise from zippers and hardware controlled?
Specify silent pulls, zipper garages, elastic keepers, and hook-and-loop silencers by part number in the tech pack rather than adding them after sampling. Noise control matters for photography and observation, and a rig that rattles reads as cheap regardless of material specification. Include a closure endurance run with the production pull fitted, and check that keepers retain their tension after repeated cycling and contamination.
How should strap padding be specified for a hip-mounted pouch?
Specify function before thickness: spread pressure after compression, maintain airflow, resist sweat uptake, or shield the body from a hard module edge. Thick soft foam feels good initially and then collapses, leaving the strap edge as the contact point. Closed-cell foam spreads pressure, spacer mesh maintains airflow but compresses, and a bonded sandwich can do both. Edge treatment drives most comfort complaints.
How do sweat, sunscreen, and dust affect strap materials?
Salt, repellent, and grit accelerate coating breakdown, dye loss, and abrasion, and they change how webbing behaves in an adjuster. Conditioning in validation should include a credible contamination exposure and a wet-dry cycle rather than clean laboratory handling only. Watch for polishing at adjuster contact, colour transfer assessed through AATCC 8, lining matting, and odour retention in contact materials.
Which tests belong in a chest and waist validation plan?
Primary-axis pull, edge peel at the vulnerable corner, angled snag simulation, cyclic strap adjustment, loaded closure cycling, and a fitted wear trial on the intended terrain. Material evidence can draw on ASTM D5034, ASTM D751, AATCC 127, ISO 12947, ASTM D3884, ISO 6330, and ASTM B117 for metal parts. Validate the transit carton to ISTA 3A for the actual pack-out.
What are the sampling, production, and shipping terms for a new chest rig?
Programs are quoted on MOQ 500 per style. Sample turnaround runs 6–10 working days, extending to 12–15 working days for complex builds, while a bulk run takes 35–50 days. Payment is T/T 30/70, and any figure quoted is indicative only, FOB Xiamen, against the 500-unit MOQ. Shipment options are sea freight 25–35 days, air 5–8 days, and courier 3–5 days, so back-solve launch dates from the slowest leg.
Can one shared platform serve chest, waist, and sling SKUs?
Yes, provided the anchor pitch, buckle family, and harness receiver are defined once in an interface control drawing and reused. One harness SKU then serves multiple bodies and buyers can mix configurations from existing stock. The drawing needs datums, tolerances, approved hardware references, and a change record, and styling changes must not move the anchors without re-running the verification.
How is final inspection structured for these programs?
Final inspection is commonly run at AQL 2.5 using sampling tables from ISO 2859-1. The acceptance record should include functional checks a visual pass misses: buckle engagement, adjuster slip, zipper tracking under load, and module mounting performed as the user would perform it. Packaging checks should confirm the rig ships without permanent strap creasing and that the pack-out matches the instruction sheet.